
For quite a while, Action Scripts do not support the use of System.Net.Http.HttpClient anymore and I think that is a good measure to prevent action scripts from doing external (API) calls and enforce an implementation via either an API call action type, or an Azure event hub or service bus action. So what is the proper way to implement a use case where you want to push data towards third party systems? The documentation around this topic improved a lot recently, which is great and this should help you out, but on my journey I discovered some hidden gems and it took me a while to understand what was going on, so I thought it would be good to write down a small guide on how to best approach this type of connectivity with Sitecore Content Hub.
Our use case
Let’s say we need to publish data to an external system that needs to consume or store some of our Content Hub data. This requires us to notify that consumer whenever a new asset is created (or of course, any entity you would like to publish), or whenever an asset has been changed.
Creating a Trigger
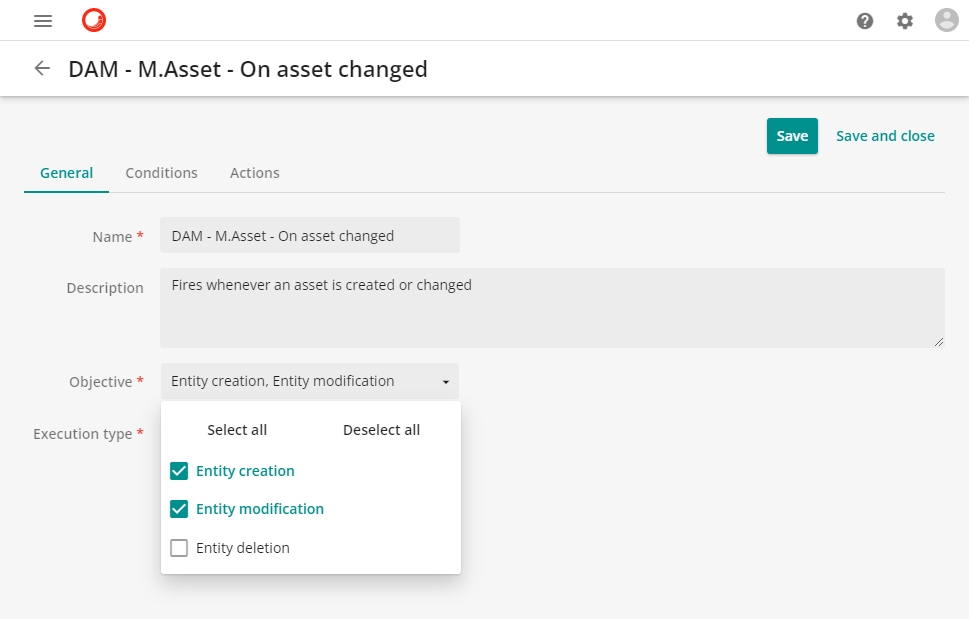
The first thing to do is to create a Trigger in Content Hub to subscribe to all creation and modification events:
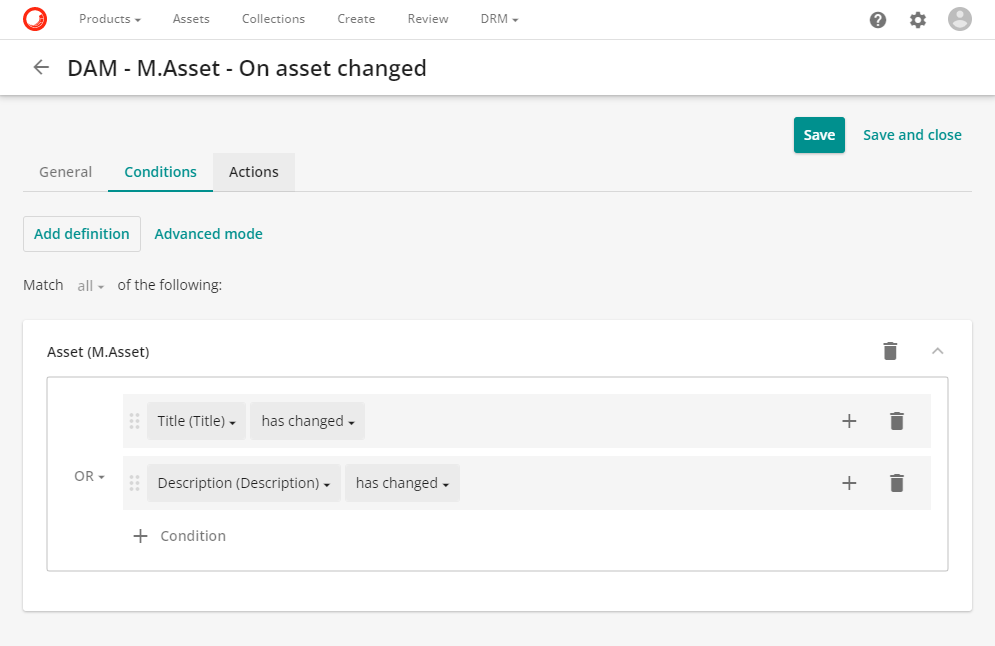
Moving on to the Conditions tab you can configure further conditions for this trigger. In earlier use cases, I subscribed to specific field changes. Like in this screenshot the Title and Description field, setting them both to has changed with an OR operator. This means that this trigger will fire whenever the value of one of the aforementioned fields changes:
However, now I would like to listen to all the fields of an asset. Or even all fields, relations, renditions and linked files. There’s no point in adding all fields manually (too much work and wouldn’t be maintainable at all), but there’s also no field that indicates an asset has changed. In the Content Hub GUI there is a field called “Date modified” under system properties, but that doesn’t show up in this list, unlike ApprovalDate or PublicationDate, which are available when configuring a condition. So how would one approach this?
When you do not configure anything at all on the Conditions tab and try to save the trigger, you get the following error:

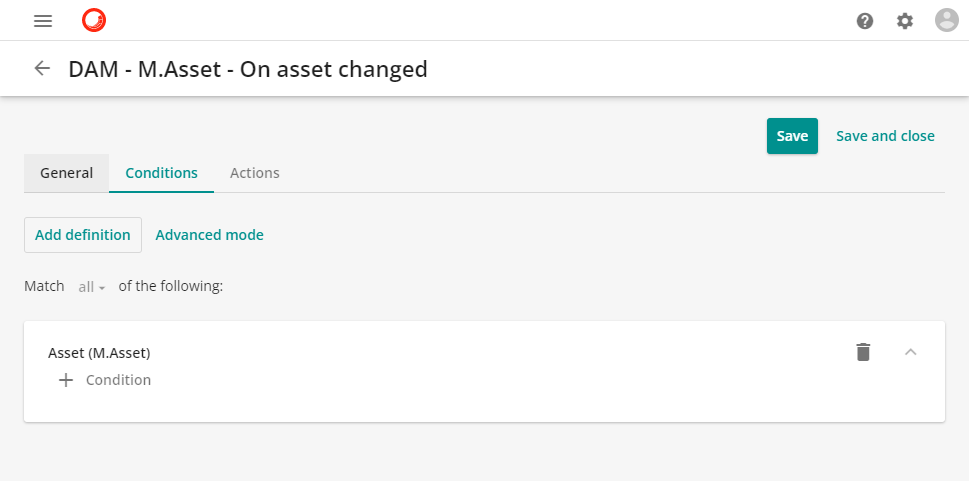
This threw me off, as I thought they were referring to the Condition under the Definition (bottom most button in the above screenshot). But as you can see, there are two types of conditions: the overall condition of the trigger, and a specific condition under a given definition. Turns out, the requirement only goes for the former, and you can perfectly well only add a definition, without any further conditions being set:
And actually, this shows that there are two levels of indicating an entity has changed, and in a certain way there is some overlap in functionality which can lead to confusion. You can specify which fields specifically need to be changed for the trigger to fire, but when you do not specify those, the trigger still acts on all changes. Still following me? So if you only want to listen to a subset of fields specifically, add a condition that has to be met for those fields to be changed. But if you want to listen to any field change, you don’t have to. And if you configure additional requirements, the trigger still fires for field values being changed in combination with your specific conditions.
An example may illustrate this better: let’s say for our use case, we only want to watch approved assets, to not publish assets still in the process of being created and completed, and to not publish rejected assets too. So we add a condition to our trigger to only fire when the asset is in the ‘Approved’ lifecycle status:
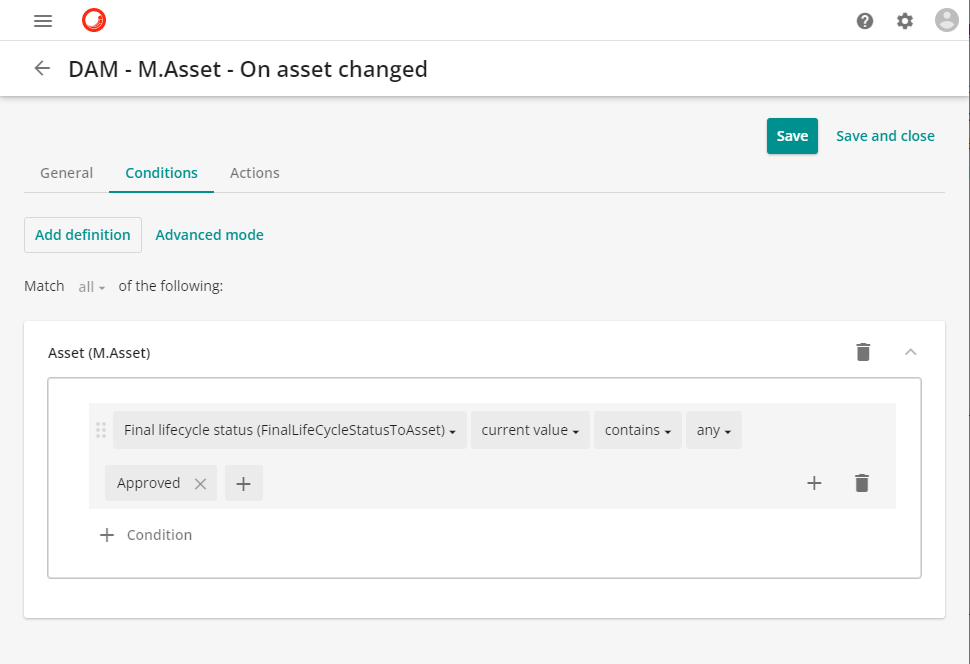
And although we haven’t listed any conditions to listen for fields that need to be changed for the trigger to fire, it still does, as this condition (referring to the whole of the conditions tab) says (in combination with the objectives configured in the general tab): when any property of the asset has changed, while in the approved lifecycle status.
Now we’re good as far as configuring the trigger, but we cannot tie an action to it yet as we still have to configure one.
Configuring an API action
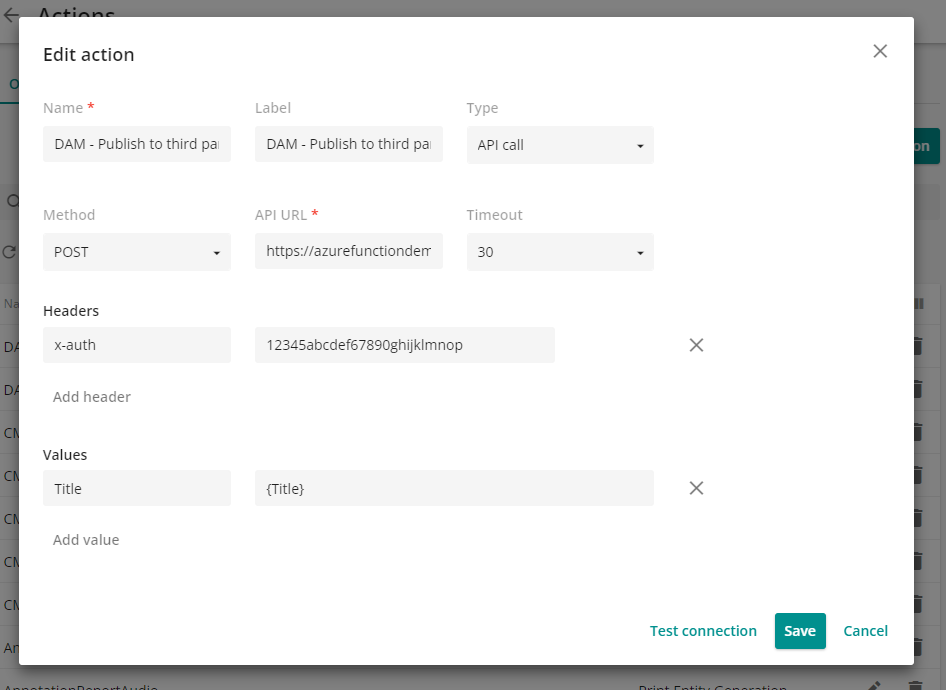
Head over to the Actions tile in the Manage section of Content Hub and add a new action. When you select the Type “API call” the relevant configuration fields will appear. The name, label, HTTP method, API url and timeout all are quite self-explanatory. The headers and values on the other hand aren’t, and the interface is leaving out some crucial but valuable information here:
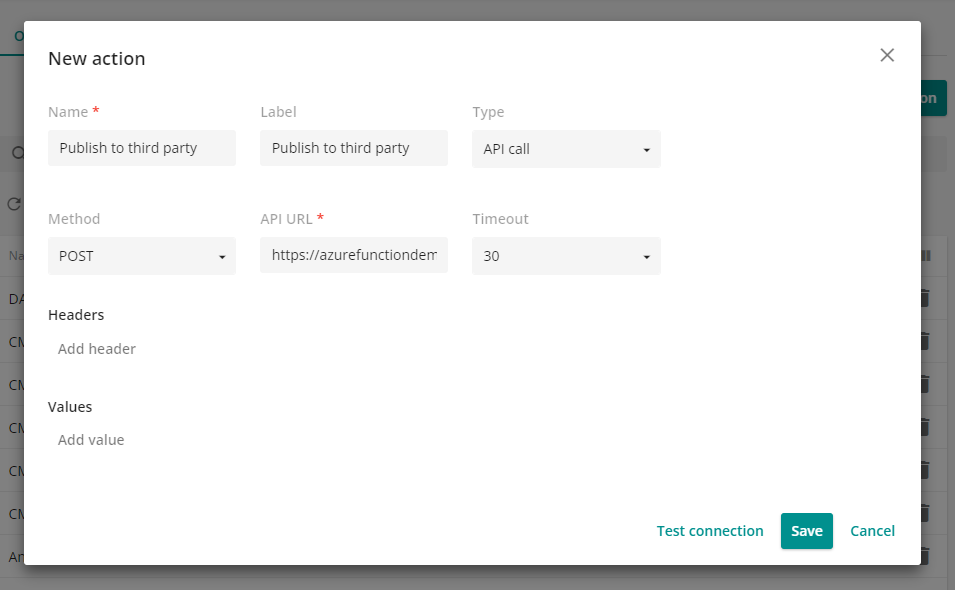
Both the Headers and the Values section allow you to add simple key value pairs, seemingly text only:

This might be useful for a fixed authentication token for example, but you also want to include some details of the entity you’re publishing to an external system. Earlier versions of the documentation didn’t even mention how to do this (although it is ‘discoverable’ by just trying things out), but now they do, making the following part a little less magic. The good news: Content Hub does automatically include a lot of meta data of the entity that fires the event, and you can add your own fields on top of that using curly brackets and existing entity property and relation names. The caveat: the casing of the attribute name must match exactly for it to work.
The first give-away shows up when you add this newly created action to your trigger in the Actions tab:
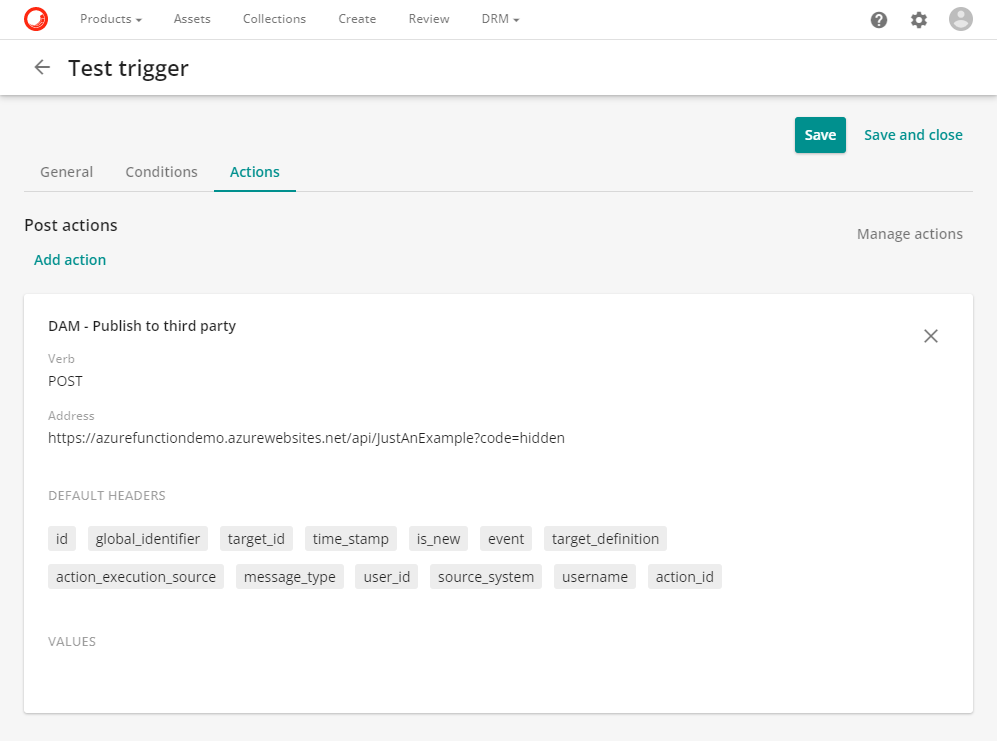
Whereas the Action GUI itself doesn’t show this, the Trigger creation / edit wizard does reveal that Content Hub packs the request with some valuable default headers. It also includes the ID of the Asset. But, not under the header “id” (although that is exactly the name of that attribute of an asset). The asset ID is shared via the “target_id” header and the “target_definition” in our case holds the value “M.Asset”. Furthermore, the headers include an identifier, source and timestamp for verification and / or validation purposes. But there’s even more going on under the hood! Content Hub even ships a payload that includes all of the actual changes. There are two ways to discover what is being sent. Of course, you can create a test API in the form of a simple Azure Function, run a test, and see what data you receive. The easier route though, is activating the trigger and going back to the Action section. Then, click on ‘Auditing’ and search for your trigger (it may be necessary to trigger an event first by editing one of your assets):
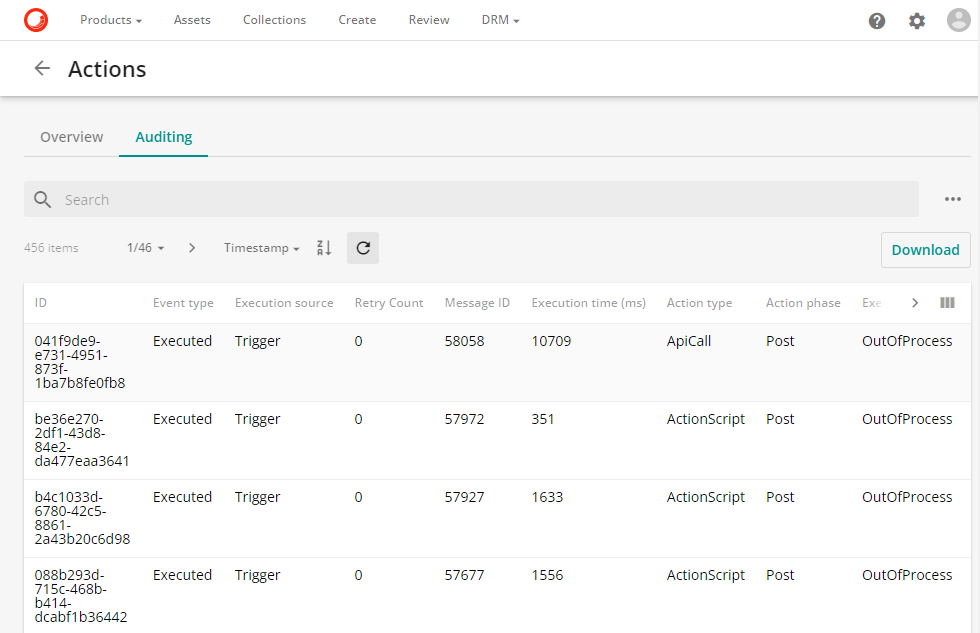
No buttons here. And while the rows have a hover state, the cursor doesn’t change to a pointer hand so at first I didn’t see this, but you can actually click on the rows, unfolding both the input (request) and output (response) of the action in JSON format!
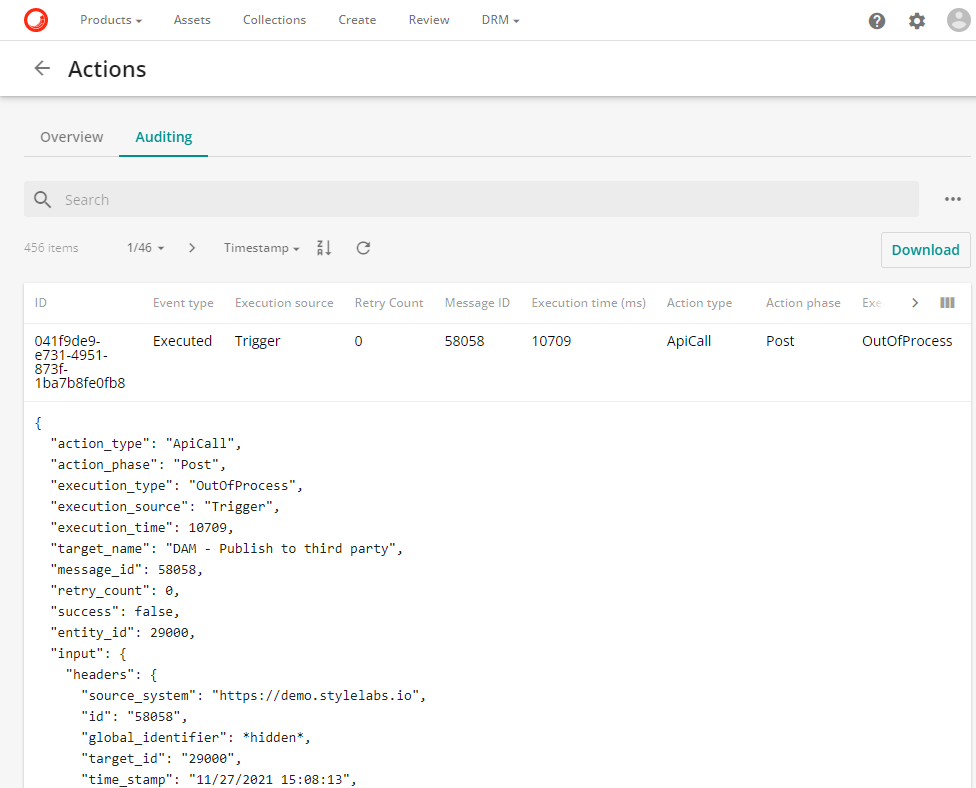
Here’s a full JSON example of an API action. Note that the actual URLs, IDs and identifiers are fictional. The node beneath “input” is the actual message being sent to the external API and the response of said API is filed under “output”. In this case, you can see I received an empty 200 OK response:
{
  "action_type": "ApiCall",
  "action_phase": "Post",
  "execution_type": "OutOfProcess",
  "execution_source": "Trigger",
  "execution_time": 1698,
  "target_name": "DAM - Publish to third party",
  "message_id": 58058,
  "retry_count": 0,
  "success": true,
  "entity_id": 6904359,
  "input": {
    "headers": {
      "source_system": "https://demo.stylelabs.io",
      "id": "64833799",
      "global_identifier": "gt54edfGHfHhkgfUTRFGhu",
      "target_id": "6904359",
      "time_stamp": "11/27/2021 15:09:03",
      "is_new": "False",
      "event": "OutOfProcess",
      "target_definition": "M.Asset",
      "action_execution_source": "triggers-ejFtGuJqK02rztSTFkTFmA",
      "message_type": "SaveEntityMessage",
      "user_id": "12345"
    },
    "content_length": 1466,
    "content_type": "application/json",
    "method": "POST",
    "request_uri": "https://azurefunctiondemo.azurewebsites.net/api/JustAnExample?code=hidden",
    "payload": {
      "saveEntityMessage": {
        "EventType": "EntityUpdated",
        "TimeStamp": "2021-11-27T15:09:03.381Z",
        "IsNew": false,
        "TargetDefinition": "M.Asset",
        "TargetId": 29000,
        "TargetIdentifier": "gt54edfGHfHhkgfUTRFGhu",
        "CreatedOn": "2021-11-17T07:55:40.7899504Z",
        "UserId": 12345,
        "Version": 23,
        "ChangeSet": {
          "PropertyChanges": [
            {
              "Culture": "(Default)",
              "Property": "FocalPointX",
              "Type": "System.Int32",
              "OriginalValue": null,
              "NewValue": 687
            },
            {
              "Culture": "(Default)",
              "Property": "FocalPointY",
              "Type": "System.Int32",
              "OriginalValue": null,
              "NewValue": 2135
            }
          ],
          "Cultures": [
            "(Default)"
          ],
          "RelationChanges": [],
          "inherits_security_original": true,
          "inherits_security": true,
          "is_root_taxonomy_item_original": false,
          "is_root_taxonomy_item": false,
          "is_path_root_original": false,
          "is_path_root": false,
          "is_system_owned_original": false,
          "is_system_owned": false
        }
      },
      "context": {
        "Title": "Christen Eagle II"
      }
    }
  },
  "output": {
    "headers": {
      "Date": "Sat, 27 Nov 2021 15:09:09 GMT"
    },
    "status_code": 200,
    "content_length": 0,
    "content_type": "text/plain",
    "content_encoding": null,
    "character_set": "utf-8",
    "response": ""
  },
  "id": "041f9de9-e731-4951-873f-1ba7b8fe0fb8",
  "audit_type": "Action",
  "event_type": "Executed",
  "severity": "Info",
  "target_id": 29000,
  "target_identifier": "6lkglh7ETdfghHHUt3lPlk",
  "timestamp": "2021-11-27T15:09:09.9608902Z",
  "user_id": 12345
}
You can also see what change I’ve made to the asset before it got triggered. In this case, it’s a programmatic field update from my Content Hub Focal Point Crop extension. If you want, you can use this changeset to keep your external system up-to-date with all changes or to trigger further detailed actions outside of Content Hub.
So that’s great, very helpful in debugging your custom API actions! But there’s one thing we didn’t fully cover yet. As I mentioned, you can also add dynamic values to the request, next to static headers and values, which is useful for authentication tokens for example. You can do this by adding a Property or Relation from the Asset (or any entity) between curly brackets. Again, mind that you need to copy the exact casing: {Filename} or {filename} doesn’t work, it needs to be {FileName}. You can check the JSON of an entity by visiting the API url (/api/entities/{id}) to make sure you are using the right casing:
And when you have done so, the value of this attribute will appear in the request under the “Context” node as you may have already spotted in the above JSON:
        }
      },
      "context": {
        "Title": "Christen Eagle II"
      }
    }
This means, when you want to read such a field from the JSON object in your consuming API, you can do something like this. Don’t forget to step into the context node, as data?.Title doesn’t work (anymore, might have been the case for earlier Content Hub versions as I have seen such demo code around):
  string requestBody = await new StreamReader(req.Body).ReadToEndAsync();
  dynamic data = JsonConvert.DeserializeObject(requestBody);
  string title = data?.context?.Title;
Also, reading data from the headers, such as the asset ID, is also a very simple single line of code:
req.Headers.TryGetValue("target_id", out var assetId);And that’s all there is to it. In the end, it’s quite straight forward but there’s much more functionality than perceivable at first sight. I am quite sure the online training doesn’t mention the possibilities and until recently at least some of the documentation around API actions didn’t mention the possibility to include any attribute dynamically. And up until now, the documentation doesn’t mention the default headers either. The default headers are crucial, because they contain valuable information about the target entity that isn’t available as a Property.
Working on Content Hub integrations I’ve learned that, adjacent to the documentation, it is a good idea to dive into all the JSON messages going back and forth between the system and the user or in this case a consuming API, as they quickly give you a thorough understanding of how Content Hub operates and what possibilities you have interacting with it. I hope this blog post helps both in building API integrations and in understanding how to approach other customizations as well.