
Content Hub: Focal point crop
Content Hub has multiple cropping strategies as you might know: crop to center, smart crop and custom crop. Smart cropping is “a feature that intelligently examines the content of an image and automatically focuses on the most important part of an image for cropping”, as the documentation states. Although the result is often spot on, it isn’t always focusing on the feature of the image you want to keep. In that case, you can choose to apply a custom crop, but this requires a lot of manual labor. Especially when you want to generate multiple crops (dimensions) of a certain asset. Whereas the crop to center and smart crop strategies are easy to automate out-of-the-box.
Another difficulty in managing the different croppings of an image, and for example validating the result of the smart crop strategy, is that Content Hub doesn’t provide you with an overview of all the available variants of an asset. To view the generated public links, you would have to click on ‘More actions’, then ‘Public links’, followed by a click per public link you have generated.
Our use case
Going over these challenges with one of our customers, we came up with the idea of adding the possibility of selecting a focal point for an asset. This should be optional though, so that the system could fallback to smart crop as its default strategy when there is no focal point data set. Additionally I wanted to automatically generate a number of desired cropping dimensions per asset and display the results on the asset detail page using clickable thumbnails. Since smart crop produces good results in general, this would automate most of the cropping and link generation process, while Content Hub users can easily validate the outcome in one glance and overrule the cropping by adjusting the focal point. Then, still, link generation should be automated. This means a user only needs one single click to improve the croppings by selecting the focal point, and can move on. Great if you have to manage a large amount of assets!
Inspiration, ideas and approach
When looking for a solution I found a proof of concept built by Tim Williamson (https://github.com/timw255/timw255.sitecore.contenthub.contentparser). This has been a great source of inspiration for me, although I wanted to do things a bit differently and make it production-ready:
- The public link generation should take place within Content Hub, I don’t want to deploy code separately or spin up extra Azure resources. This means I would choose an Internal Integration in the form of an Action Script over the Web SDK. Also, I can easily trigger this script using conditional Triggers in Content Hub to automatically kick off when a new asset is created or when the focal point data has changed.
- You should be able to set the focal point with one single click, but also be able to drag it around (afterwards) if you want to change it.
- I want to make the focal point optional, and removable as well (by clicking on it for example). In case of no focal point set, I’d revert back to smart cropping.
- I needed to revise the cropping code and strategy: I have seen multiple examples of where the resizing is calculated using custom code, also calculating if the image needs to be resized at all, and if it needs to be scaled up or down etc. The great thing about Content Hub, is that it is capable of handling all this for you. You actually don’t need to do anything other than providing the right parameters in your conversion configuration JSON!
- Our customer uses vector images like EPS files as well, but you cannot crop those when generating a public link for these asset types. So we have to find an elegant solution for this scenario too.
- We need to cope with some scenarios to make our code production-ready: what if the image isn’t processed yet by Content Hub (after creating a new asset)? In this case some parameters like dimensions are not available yet, which shouldn’t crash our extension. Also, what if the user resizes the screen? Then we need to recalculate the focal point relative to the preview image… Or what to do when the asset media type is of a non-croppable type?
- And last but not least, I want to display a preview of the generated croppings based on the chosen focal point on the asset detail page.
Ingredients
So what do we need to build this extension into or on top of Content Hub? Content Hub offers a number of ways to customize and extend both its UI and processing, and for this extension with a few of them:
- Schema: extend the M.Asset schema with a focal point x- and y-coordinate.
- Scripts: a C# (action) script to generate public links based on the desired cropping strategy for all the different dimensions.
- Actions: a new action to encapsulate this script to be able to call it using a trigger.
- Triggers: a conditional trigger that fires the above script whenever a new asset is created or when the focal point data is added, changed or removed.
- Transformations: this might be a strange one, but I chose to use the transformation functionality to scale down my public links to the size of a thumbnail for my preview functionality on the asset detail page.
- Media processing: we’re going to extend the media processing flow for vector images, I’ll get to that later.
- External page components: we need two external page components to implement focal point cropping. One component to replace the asset image preview to be able to set the focal point visually, and one component to display the automatically generated public links and thus the result of the cropping.
Implementation
I won’t go over all of the elements and code bits of the implementation, as it should be quite self-explanatory and hopefully documented well enough within my code repository. You can also check out the video for a complete overview of the extension. I do want to highlight a few parts though that may not be so obvious:
Understanding cropping configuration
The great thing about Content Hub is that all data is accessible via the API and that everything is communicated via easy to understand JSON objects. While the documentation on integrations doesn’t always cover all the options or parameters available (or at least I couldn’t find them), a lot of what is going on under the hood is easy to find using the Network tab of your browser’s Developer Tools. I actually learned a lot by performing croppings via the UI of my Content Hub sandbox while inspecting the API calls that those actions generated. For example, a Custom crop is indicated by the cropping_type Custom, Smart crop though is called Entropy in the API.
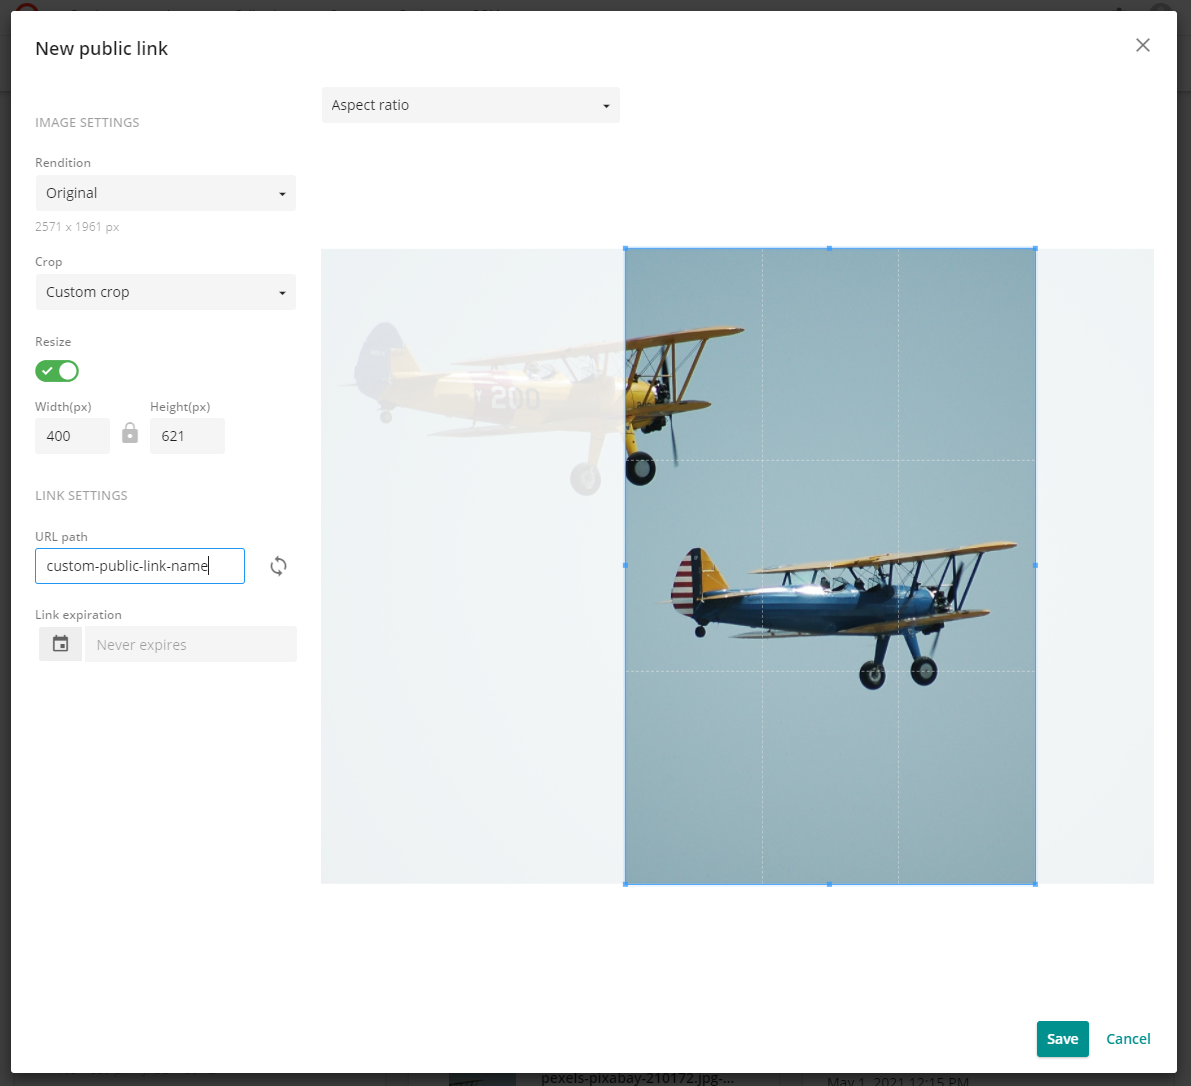
So let’s create a public link as I have done in the screenshot above, and take a look at the JSON generated by this action. I’ll go over the different elements and explain them right away in comments:
|
1 2 3 4 5 6 7 8 9 10 11 12 13 14 15 16 17 18 19 20 21 22 23 24 25 26 27 28 29 30 31 32 33 34 35 36 37 38 39 40 41 42 43 |
"ConversionConfiguration:" { "cropping_configuration": { // we either pick Custom for focal point cropping // or Entropy for smart cropping when no focal point has been set "cropping_type": "Custom", // the offset of the upper left corner of the cropping area // relative to the original dimensions of the rendition // only applicable when performing a custom crop "top_left": { "x": 941, "y": 0 }, // this might be a tricky one and is easily done wrong! // don't enter the target dimensions of the desired end result here // as we're in the cropping configuration, we should enter the dimensions // of the cropping area relative to the original dimensions, // thus before the resizing takes place // and to make it a bit more complex, this is only the case when doing // a custom crop (with a top left offset) // for smart cropping, these can be equal to the desired dimensions "width": 1264, "height": 1961 }, // the original dimensions of the rendition used for cropping "original_width": "2571", "original_height": "1961", // the desired dimensions of the end result "width": 400, "height": "621", // in our case, free is always okay as we don't want to restrict on ratio "ratio": { "name": "free" } } |
Here you can see, you have to be cautious with the different width and height parameters, but other than that, no calculations are required to prepare the scaling and cropping process. This means that the core of my whole Content Hub extension is surprisingly compact and the actual cropping only requires a few lines of code:
|
1 2 3 4 5 6 7 8 9 10 11 12 13 14 15 16 17 18 19 20 21 22 23 24 25 26 27 28 29 30 31 32 |
int offsetX = 0; int offsetY = 0; var widthRatio = (double)originalWidth / targetWidth; var heightRatio = (double)originalHeight / targetHeight; var relativeWidth = originalWidth; var relativeHeight = originalHeight; if(widthRatio > heightRatio) { relativeWidth = (int)Math.Round((double)originalHeight / targetHeight * targetWidth); offsetX = Math.Min(Math.Max((int)Math.Round((focalPointX.Value * scaleFactor) - relativeWidth / 2d), 0), originalWidth - relativeWidth); } else if(widthRatio < heightRatio) { relativeHeight = (int)Math.Round((double)originalWidth / targetWidth * targetHeight); offsetY = Math.Min(Math.Max((int)Math.Round((focalPointY.Value * scaleFactor) - relativeHeight / 2d), 0), originalHeight - relativeHeight); } conversionConfig["cropping_configuration"]["cropping_type"] = "Custom"; conversionConfig["cropping_configuration"]["top_left"] = new JObject(); conversionConfig["cropping_configuration"]["top_left"]["x"] = offsetX; conversionConfig["cropping_configuration"]["top_left"]["y"] = offsetY; // mind that the cropping configuration dimensions shouldn't per se contain the target dimensions, but the crop area dimensions before resizing // this equals the target dimensions ratio scaled up to the original dimensions, which is calculated above conversionConfig["cropping_configuration"]["width"] = relativeWidth; conversionConfig["cropping_configuration"]["height"] = relativeHeight; |
You can find the rest of the code in my GitHub repository, which contains the public link generation, as well as taking the different scenarios into account for things like defaulting back to smart cropping, or omitting uncroppable media types like Videos and Documents.
Cropping vector images
Talking about media types: as I mentioned earlier, vector images like EPS files cannot be cropped when creating a public link of the original (main) file in Content Hub. Still, I wanted to be able to add a focal point and create different croppings of these images too. The solution I came up with is simple and easy to implement using default Content Hub functionality: just add an extra rendition to all vector assets upon creation. You can do this by utilizing the media processing flows; and only for the Vectors flow, add a Convert image task to an unresized 72 dpi version in the sRGB color space named bitmap_for_web:

Make sure to output it as a rendition and add a new rendition link, adding read permission and usage for at least download and public link generation. Within the action script, for the public link cropping generation, we can than switch to this rendition when we discover the current asset is of the Vectors media type:
|
1 2 3 4 5 6 7 |
if (assetMediaType.Equals("Vectors")) { // switch to another rendition resource for vector images, as the original file cannot be cropped // this rendition should be configured in the media processing flow for vector images for this script to work renditionResource = "bitmap_for_web"; |
The only thing that bothers me in this solution, is that I have to hard-code the rendition name to match the generated rendition. It works perfectly fine, and I couldn’t think of a better way for now, but if you have suggestions I am absolutely open to a more elegant solution to this.
One extra challenge I came across was the following: the original main file is stored in 300 dpi, so my focal point is calculated relative to this resolution. The bitmap for web rendition is only 72 dpi and is being resized by the media processing flow, so the focal point should be scaled back accordingly. To solve this, I have added a scale factor in my action script that represents the scaling factor between the previewed main file and the rendition used for cropping. When composing my cropping configuration JSON I simply multiply the offset coordinates with this scale factor to allow for differences in resolutions.
The result
Most of the configuration and processing is done under the hood, and for the Content Hub user there are only two changes to the Asset detail page to interact with in order to utilize this new functionality.
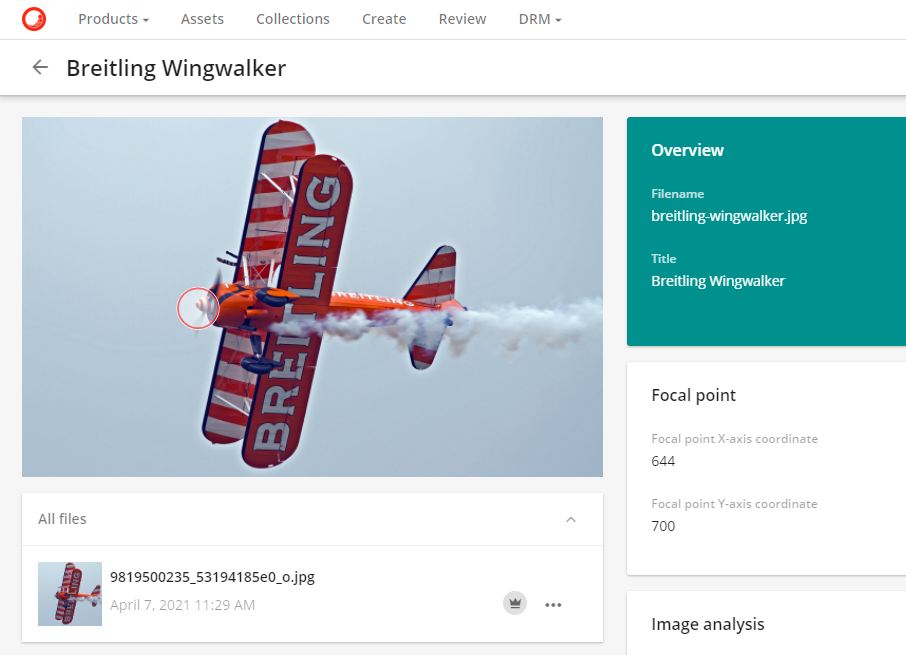
Focal point viewer
I have replaced the default entity image viewer with a custom external page component allowing the user to select the desired focal point. It can also be dragged around for fine-tuning, or removed by clicking on it:
Whenever the focal point has been set or changed, the corresponding trigger fires up the action script in the background, re-generating the public links to match the desired cropping strategy indicated by the user.
Public links preview
The customer explicitly asked for no paging in this component to be able to see all available croppings in one glance. Scrolling is the new paging anyway isn’t it? I decided to re-use the CSS styles and classes of the ‘All files’ component here and didn’t introduce my own classes (for unity and probably less maintenance). I also re-used the refresh icon and its rotate transform animation, binding it to a simple recall of the render function of my public link list, to be able to refresh the component when the focal point has been set or has changed, or when you have added a public link manually. The thumbnails shown in this overview are loaded via a transformation that resizes the images on the fly to a maximum of 100px in either dimension:
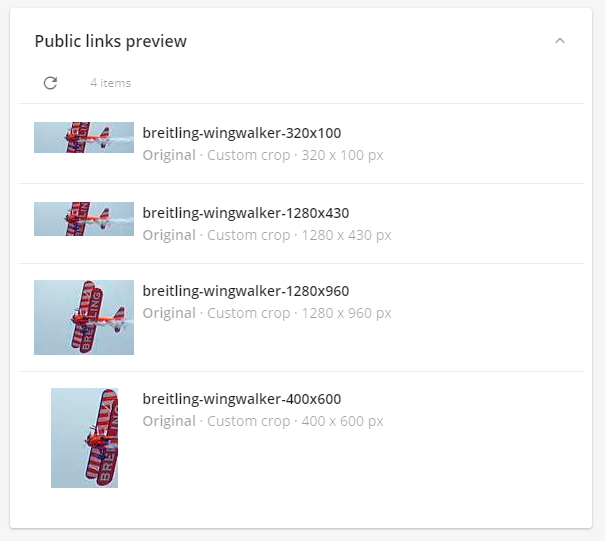
I have included details like the rendition (in bold) used for the cropping (which comes in handy when you have more renditions in your assets or when you have cropped a vector image) and the cropping strategy used, as well as the actual dimensions of the public link. This way, users can easily validate if the outcome of the focal point they have set matches their expectations for each available cropping.
Demo & code
I am very pleased with the outcome, the simplicity of using this new feature for the end users, as well as the resilience of the integrations for coping with the different scenarios and situations of uploading, resizing and the different asset types. Content Hub really surprises me in how flexible it is built, allowing for rigid and powerful extensions. Still, I am confident testing it in production (starting next week) will bring up some new unforeseen scenarios, so keep an eye out for changes to the code in my repository or submit a Pull Request if you spot something that could use improvement: https://github.com/robhabraken/content-hub-focal-point-cropping.
For a demonstration of the functionality and a full walkthrough of all elements of this integration check out my video on YouTube:
Comments
Comments are disabled for this post