Azure Gateway for Sitecore
Strong ciphers & SSL termination without ASE
Multiple recent pen tests have shown us that Azure Web Apps by default do not support the (strong) SSL ciphers we desire. Not willing to make the jump to the Application Service Environment (ASE) right away, we decided to try and secure our Web Apps using an Application Gateway. One of the more complex requirements was that we only wanted to use one gateway per enviroment, while still being able to use role specific IP whitelisting. Since we’ve had a fair bit of a struggle to set this up, I would like to share our approach for you to learn from and comment on. We are running this in production for a while now. This does mean that it is a proved and secure solution, confirmed by a profound pen test recently, but I am sure there’s room for improvement, so if you have any tips or feedback, I would be more than happy to hear from you and further complete this article.
We would like to use public Cloud and PaaS managed services while enhancing the level of security and control
Reasons for using a Gateway
By default, public Web Apps only support low and medium strength SSL ciphers, which cannot be changed. An Application Gateway allows for customizing those. Also, SSL configuration becomes easier with SSL termination (or offloading if you like). Lastly, you have additional features at your disposal like http/2 and WAF. The latter could be tricky though, but more on that later.
Azure Application Gateway Terminology
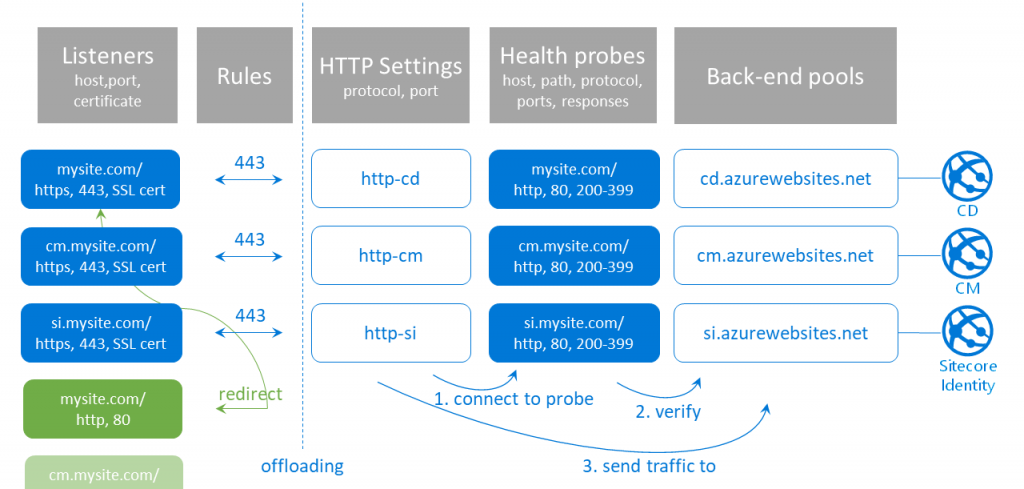
To understand how an Azure Application Gateway (AAG) works, you need to learn about its building blocks. There’s quite a few, which makes configuration a little bit more time consuming, but also way more flexible. And we have ARM templates to help us out here! But first, what do we need to know? We’ll go backwards in this, inside out, because I think this makes things easier to explain.
Back-end pools
A back-end pool is the end node of your AAG, to which the traffic will be sent. Practically, this means each Web App (or Sitecore role instance) you want to expose through your gateway needs to have a corresponding back-end pool. Your Content Delivery role gets one, the Content Management role, and probably also the Sitecore Identity role instance. This is the set of public facing roles in the setup we’ve used, and the set I will use throughout my blog post. It is of course very well possible to extend this to other roles as well, using the same principle. Or to use less in less complex topologies.
Health probes
A health probe is necessary to validate or verify the validity of your back-end pool. Your AAG will always check if a back-end is healthy before sending traffic to it. So, if your Web App works fine, but the health probe isn’t configured correctly, the AAG will not send any traffic to it, presenting a nice 503 bad gateway message to your visitors. You also need multiple health probes, because such probes are host, path, protocol, port and response specific. You need to determine which response is considered healthy for a specific combination of host, path, protocol and port.
HTTP Settings
An HTTP setting is basically a combination of a protocol and a port, but for a specific Sitecore role in our case. Why? Because you connect an HTTP Setting to a specific health probe, which in turn connects to a specific back-end pool, which is linked to a certain Sitecore role. So despite the fact that all of our connections (due to SSL termination) within the AAG use the http protocol over port 80, we still need multiple HTTP Settings.
HTTP Settings always connect to a health probe, first verifying the validity of the back-end pool, before sending traffic to it.
Listeners
Listeners are being used to configure where your AAG should listen to. Quite literally. If there’s no listener for a specific host (name), port or certificate, it won’t work. This will lead to an unresolved URL, no error, no 503. Just nothing there. So you want to at least have listeners for https (443) and http (port 80) – where the latter is merely there to redirect visitors to the safe way in. But for a common Sitecore topology, you’d also want to create listeners for your role specific URLs, like the Content Management role or your Sitecore Identity instance.
Rules
The last thing we need to hook us up is a set of Rules. A rule basically just tells the AAG how to respond to a request picked up by one of the listeners. We have two different types of Rules in our setup: a rule that directly sends traffic from a 443 listener to its corresponding HTTP Setting. And a Redirect Rule, that catches traffic from a port 80 listener and sends it back to the corresponding secure Listener. Yes, that’s right, you redirect it back in, to the port 443 listener of the same host, and that listener will handle it from there on.
This means, if you want to expose the Content Delivery, Content Management and Sitecore Identity roles, you have at least 6 listeners: 3 for SSL, and 3 for redirecting insecure traffic to SSL. Because you need to redirect to a specific listener, which is tied to a specific rule, HTTP Setting, health probe and back-end pool, you cannot have a single catch-all port 80 listener.
A typical AAG Setup for Sitecore
Now we know what components we need, we can create an overview of a setup for a typical Sitecore topology. Ours looks like this:
SSL Termination
If you want, you can create HTTP Settings that handle secure traffic. But doing so, you would need to configure your SSL certificate on all of those HTTP Settings too, next to the Listeners that require such. This makes the AAG configuration more tedious and also more complex and time-consuming to maintain. Hence, we want to configure SSL one time only, at Listener level. In the listeners, we refer to our SSL preset, and behind the Rules (connection to the HTTP Settings) everything onwards is plain http.
Whitelisting magic
Now it’s time for some wizardry. If you want to use whitelisting, you could do this on subnet level, using the Network Security Group (NSG) your AAG lives in. But this would automatically apply to all of the connections going through your gateway, and thus for all of your Sitecore roles. For a fully protected environment such as a DevTest or UAT setup, this would be fine. Even the preferred way to go. But it would fail for role specific whitelisting.
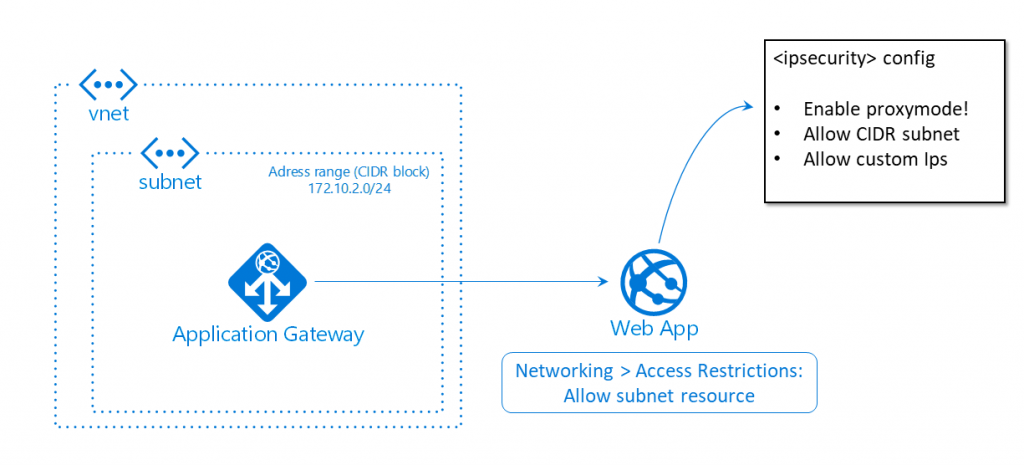
So this is exactly where we’ve pulled the rabbit out of the hat. Admittedly, it does feel a bit hacky, but I assure you it isn’t. To begin with, we don’t restrict incoming traffic to our AAG. No whitelisting on NSG level. Instead, we use our good old <ipSecurity> config node to configure whitelisting. But doing so, we encounter three issues:
- Our gateway receives the originating IP. Your Web App receives the IP address of the AAGs subnet. Logically, all incoming traffic via the AAG has the same IP. The solution to this, is enabling proxy mode in your ipSecurity-configuration. Because the AAG copies the originating IP over into the x-forwarded-for header. The proxy mode of the ipSecurity node makes it so your Web App checks both the originating IP (== AAG subnet) and the x-forwarded-for header (== originating IP if you will):
<ipSecurity allowUnlisted="false" enableProxyMode="true">
- It is still possible to visit the Web App directly from the whitelisted IPs (although you need to hack your way into it, because the host name is resolved via the AAG). To fix this vulnerability, we simply add an Access Restriction on the Networking tab of our Web App, to only allow traffic into our Web App coming from the subnet resource our AAG lives in. By only allowing this route, you force all traffic through the AAG. And the sweet thing is, you don’t need to configure IPs here, you can just point to an existing Azure resouce, being the specific subnet (resource).
- It looks like we’ve got everything covered, but you would now get a 503 bad gateway. Why? Because the Access Restriction pointing to the subnet configured at step 2 of this list doesn’t work for the Health probes we’ve configured inside our AAG, and we cannot point to our Health probes directly in the Networking tab, because this isn’t an Azure resource. Hence, we need to add the IP address of our subnet to the <ipSecurity> configuration as well, allowing the health probes to check our Web App. You can configure the subnet IP address yourself, but you can also easily see what IP address and subnet mask you need to permit in the Web App web server logs. I’m not all to happy with this requirement, and hard coded IP, but to date I did not yet find a better solution.

Wrap it up with ARM
I have built this complete configuration in the Azure portal manually, mainly because it allowed for experimenting. But once we got the desired result, it was time for my favorite step: the one to Infrastructure as Code (IaC). You can export the AAG and related resources to an ARM template in the Azure portal. But that is merely a good starting point. It contains a lot of hard coded values, URLs, and stuff that isn’t really environment agnostic. So you need to go over all of it and parameterize everything, adding variables and moving stuff like SSL certificate values to the KeyVault. The result can be added to the Sitecore ARM provisioning as an additional template. And now, our AAG is part of our repeatable IaC Sitecore deployment, which we can use for other projects as well!
I am happy to share my ARM script with you. Please feel free to download, use, comment or file a Pull Request:
https://github.com/robhabraken/Sitecore-Azure-Scripts/tree/master/Azure%20Application%20Gateway
Utilizing your Azure Gateway
As you can see in the ARM template, down at the bottom we have utilized and enabled a few new features (to us). Exactly the ones that got this all started. Here we can configure the specific SSL ciphers we desire, a minimum protocol version like TLS 1.2, but also quite easily just enable http/2 by simply setting a variable value to true! Mind that we also chose to enable auto-scaling to prevent our AAG from being a single point of failure in the whole PaaS architecture and Sitecore topology.
Web Application Firewall
And lastly, you could choose to enable WAF. However, to my knowledge it is not yet supported by Sitecore, at least certainly not by versions up to 9.0. This means that you can use the Detection mode, to be able to scan through the logged traffic and spot security threats. But you should not use the Prevention mode, because that could potentially block more than you would want to, which means you will break Sitecore. Additionally, the autoscaling and IP whitelisting we’ve used are not supported (at least up to 9.1). So in our use case, we opted for a WAFless gateway.
For more info on configuring an Azure Application Gateway, please check out the Microsoft docs at https://docs.microsoft.com/en-us/azure/application-gateway/configuration-overview.


Comments
Comments are disabled for this post