
PaaS to AKS: an overview
This blog post is part of a series about building a production ready Continuous Integration setup for Sitecore using K8s containers on AKS. For more information and other articles on this subject check out the series index.
Setting up a new environment from A to Z
Going over a complete provisioning, installation and deployment of a Sitecore container deployment to AKS, I have noticed that the process contains a lot of steps that have dependencies on earlier steps in the process, making the order very important, but also confusing because there are so many small tasks to take into account. That’s why I decided to go over the entire process of setting up a new environment, documenting each step along the way, to create a good foundation for further automation of the provisioning and deployment process. Again, pursuing a full Infrastructure-as-Code setup, while documenting any necessary manual configurations.
In this overview I am using the scripts and ARM templates as provided in my repository https://github.com/robhabraken/paas-to-aks, and as described in the previous blog post of this series.
Preparation
Maybe I’m stating the obvious here, but in order to be complete, let’s start by creating an Azure account and DevOps instance if you do not already have one. Also, we need to set up a repository and download the appropriate files.
1. Create an Azure account
2. Create an Azure DevOps project
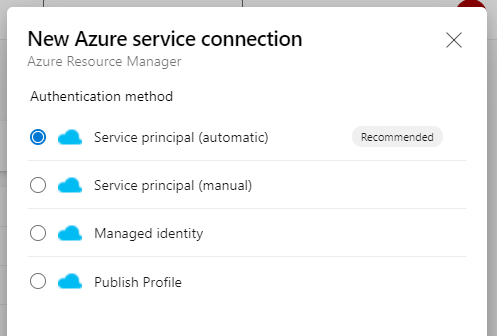
3. Create an Azure service connection from your DevOps project to your Azure subscription using the automatic Service principal creation:
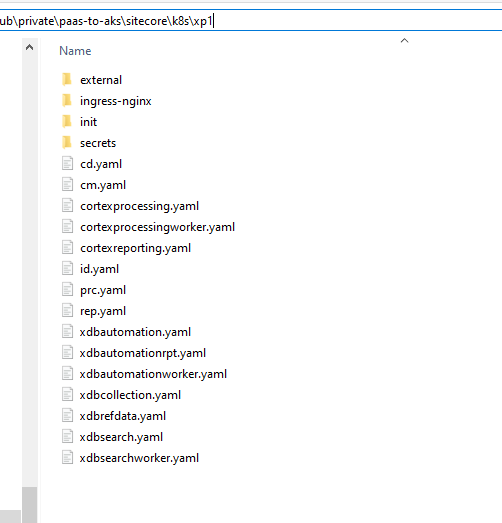
4. Fork and clone my repository, download the Container Deployment files from Sitecore and populate the K8s directories accordingly:
5. Fix the hard-coded Redis connection string in the K8s specification files as provided by Sitecore. For an explanation on how to do this, read the “Fixing the hard-coded Redis connection” section of my previous blog post.
Manual configuration
Now we need to do some manual configuration. First, we will provision a Key Vault instance, because that is used and referenced by multiple ARM templates. Secondly, we are going to configure the parameters of our ARM scripts so we can run them later on.
6. Set the servicePrincipalId in the keyvault.parameters.json file of the Key Vault ARM template to the ID of the Service Principal created in step 3
7. Provision the Key Vault using the .\deploy.ps1 script provided with that template
8. Update all parameter files used by the ARM templates with the subscription ID and the Key Vault reference. The "keyVault"."id" within the parameter file should be formatted like this:
|
1 2 3 |
/subscriptions/00000000-0000-0000-0000-000000000000/resourceGroups/{resource-grou-name}/providers/Microsoft.KeyVault/vaults/{keyvault-name} |
There are only two parameter files that need to be configured:
PowerShell scripts
Then we can move on to the PowerShell scripts. Some of them could be run from an Azure DevOps pipeline, but because they require bringing your own license file and possibly certificates, we still need to do some things manually. Furthermore, these steps only need to be executed once, and the deployment of the AKS cluster is easier to run from the Azure CLI because it requires elevated user rights: the az aks create command creates another App Registration (Service Principal) which isn’t allowed to do via another Service Principal, which would be the case if we ran from a DevOps pipeline (going over the SPN created at step 3).
9. Add your Sitecore license file to the repository and use this script to compress the license file and push it into the corresponding K8s secrets file
10. Add an identity server signing certificate by generating a self-signed certificate using this script or bring your own certificate for this purpose; mind that the script referenced also converts the generated script to a base64 string before pushing it into the corresponding K8s secrets file – if you bring your own than you can use the last line of this script to do the same for your certificate file
11. Add TLS Certificates for the Ingress controller by using this Batch script, or again, bring your own
12. Some K8s secrets files as provided by Sitecore contain default values, like http://solr:8983/solr;solrCloud=true for the Solr connection string, mssql for the database server name, and sa for the database user name.
It is very important to change those files, especially since we’re not using the EDS containers provided by Sitecore. We are running our own PaaS based External Data Services, which have different connection strings, and also, the sa user name isn’t allowed when running Azure SQL PaaS databases. Go over all files and change them if necessary or desired. Mind that, if you will leave a file empty, my Key Vault script generates a random value for this secret; but when the secrets file already contains a value, it will be lifted into your Key Vault instance and referenced accordingly.
13. After preparing the secrets, we can now populate our Key Vault instance: let’s generate, upload and parameterize all of our secrets by running this script; for more info about this script read my blog post about provisioning secrets from AKV
14. Because we have added ARM based Solr Cloud provisioning, we need to store the Solr admin credentials somewhere in the provisioning process. You can either do that in an Azure DevOps Library Variable group, or as we did, add them to the list of secrets in your Key Vault instance. The following secrets need to be available in order for this template to work:
- sitecore-solr-admin-username (e.g. “solrAdmin”)
- sitecore-solr-admin-password
To avoid introducing another manual step and to make the process less error-prone, I have added a function named Add-SolrCredentials to my populate Key Vault script that does this automatically for you together with step 12.
15. With everything set up so far, it’s time to finally deploy our AKS cluster! Run this PowerShell script from your CLI and wait for a bit…
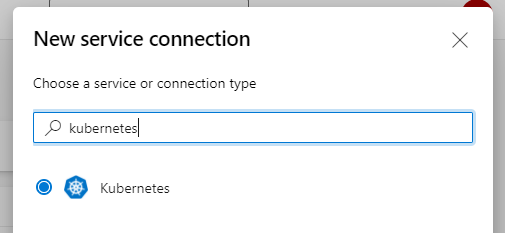
16. Not yet necessary now, but when we will convert the next section into an Azure DevOps pipeline, we need another Service connection. This time, create a service connection of the type Kubernetes and point it to the cluster you just created:
Init pipeline
At last, we arrived at the part we can fully automate. Although this is a one-time process (you only use this pipeline when setting up a new AKS environment), it still is a valuable asset to our boilerplate. Creating a YAML pipeline for this makes setting up new environments a breeze. Also, the tasks within this pipeline will never change, as all of the manual configuration and variables has been moved to the templates and the Key Vault secrets.
Note: this article only documents the steps needed to set up a new AKS environment for Sitecore, so it does not yet cover the mentioned pipeline itself. All of the steps of this section (16 to 22) can and should be executed from an Azure DevOps pipeline over the Service connections created earlier. However, the code and setup of this pipeline will be shared and explained later on.
17. Deploy the External Data Services using the following ARM templates (translating to a task each in our pipeline):
- Deploy the VNet using the deploy-vnet.json template
- Deploy the (private) Container Registry using the deploy-acr.json template
- Deploy the elastic SQL PaaS pool using the deploy-sql.json template
- Deploy the Redis cache using the deploy-redis.json template
- Deploy the Solr Cloud instance using the .\deploy.ps1 script, which includes an ARM template and .sh bash script to set up the Solr Cloud instance
18. Update the network configuration for Solr and SQL to allow communication with the AKS Cluster as described in the section “Allow AKS to access the EDS” of this article; a script to automate this task will follow shortly!
19. Dependency-wise, things are getting a bit complicated now. If you followed the tutorial and added a K8s secret for the Redis connection string in step 5, the corresponding Key Vault secret contains a default or random value, as the AKV was populated at step 13, but the actual Redis connection string wasn’t available before the provisioning of the EDS at step 17. So you should retrieve the connection string from the Redis instance, and update the sitecore-redis-connection-string secret in the Azure Key Vault with that value. It’s on my things-to-do-list to create a script for that as well.
20. Replace the reference tokens in your K8s secrets files with the actual values from your Azure Key Vault instance using the “Replace Tokens” task in DevOps and then deploy the secrets to your AKS instance:
|
1 2 3 |
kubectl apply -k $(KubernetesArtifacts)/$(topology)/secrets/ |
21. Deploy the NGINX Ingress controller using this script
22. Run the SQL and Solr initialization jobs:
|
1 2 3 |
kubectl apply -f $(KubernetesArtifacts)/$(topology)/init/ |
23. Wait for the initialization jobs to complete:
|
1 2 3 4 |
kubectl wait --for=condition=Complete job.batch/solr-init --timeout=600s kubectl wait --for=condition=Complete job.batch/mssql-init --timeout=600s |
24. Deploy the Sitecore pods for the desired topology and wait for them to become available:
|
1 2 3 4 |
kubectl apply -f ./ -f $(KubernetesArtifacts)/$(topology)/ingress-nginx/ingress.yaml kubectl wait --for=condition=Available deployments --all --timeout=1800s |
Post-provisioning steps
As instructed by the Sitecore Installation Guide, after a successful deployment of the Sitecore pods, we need to configure and rebuild the Solr Cloud indexes. But first, let’s finish off the provisioning process with one more script to grant AKS access to our ACR.
25. Initially, we included linking the AKS cluster to the private ACR in the AKS provisioning script itself, but since we do not yet have the EDS set up at that time (trying to centralize as many tasks into the automated init pipeline), this needs to be done separately afterwards. And again, manually, because you cannot grant rights via a Service connection. So run this script from your CLI in order to link the AKS to the ACR for future custom deployments.
26. Configure the Solr Cloud indexes via the Populate Managed Schema wizard from the Sitecore Control Panel, and rebuild the indexes afterwards using the Indexing Manager as indicated by the Sitecore Installation Guide.
Blue green (re)deployment
You now have a fully operational, production ready vanilla Sitecore (XM or XP) installation running on Azure Kubernetes Services! The initial one-time setup is done and we can move on to the next chapter: deploying a custom Sitecore implementation to our shiny new containers.
27. Deploy your custom Sitecore implementation. This I will cover in one of my next blog posts on PaaS to AKS.
So we’ve still got a lot of topics to cover (deployments, pipelines, monitoring, scaling), but at least, we now have a clear and repeatable process of setting up our AKS environment!
Comments
Comments are disabled for this post